Bulb mites are tiny white mites that hide inside damaged bulbs, corms, tubers, onions, and garlic. They feed under scales and around basal plates, causing scars, poor rooting, weak shoots, and rot. Learn how to spot infestations, remove damaged bulbs, improve storage, prevent spread, and protect future plantings.
If a bulb looks healthy on the outside but fails to sprout, grows weakly, or turns into a soft, sour-smelling mess in storage, the problem may be more than ordinary rot. Bulb mites are tiny, pale mites that hide beneath bulb scales, around the basal plate, and inside damaged underground tissue. They are easy to miss, but once they build up, they can turn valuable bulbs, corms, and tubers into decaying pulp.
Bulb mites are most often species of Rhizoglyphus, especially Rhizoglyphus echinopus and Rhizoglyphus robini. They are not insects. They are mites, related to spiders and other arachnids, and they thrive in damp, damaged, or rotting plant material. In flower bulbs, vegetables, and greenhouse crops, they can be both a direct pest and a partner in decay, feeding on injured tissue while helping fungi and bacteria move deeper into the bulb.
This makes bulb mites especially frustrating. They are often described as secondary pests because they frequently follow wounds, fungal disease, rough handling, waterlogged soil, or poor storage. But once colonies become established, they can seriously weaken plants, destroy the basal plate, reduce rooting, stunt new growth, and spread through stored bulb lots.
Scientific names: Commonly Rhizoglyphus echinopus, Rhizoglyphus robini, and related acarid bulb mites.
Common names: Bulb mites, acarid bulb mites, root mites, rhizoglyphus mites.
Main damage: Mites feed in bulbs, corms, tubers, roots, and underground plant parts, especially in wounded, diseased, or decaying tissue. Feeding can injure the basal plate, reduce rooting, stunt growth, and accelerate bulb rot.
Key symptoms: Soft or rotting bulbs, reddish-brown scars on fleshy scales, damaged basal plates, poor rooting, weak shoots, stunted or yellowing leaves, distorted growth, failed sprouting, sour odor, and tiny shiny white mites moving slowly in colonies under damaged scales.
Common host plants: Bulb mites can affect Narcissus, tulips, hyacinths, lilies, irises, freesias, gladiolus, alliums, onions, garlic, and other bulbs, corms, and tubers.
Favored conditions: Damp storage, poor ventilation, injured bulbs, fungal rot, bacterial decay, excess organic debris, waterlogged soil, reused contaminated potting mix, and warm storage conditions.
First action: Inspect the basal plate, roots, and damaged scales with a hand lens. Discard soft, rotten, foul-smelling, or heavily infested bulbs.
Best control strategy: Prevention, sanitation, dry storage, clean planting stock, good drainage, careful handling, removal of rotting bulbs, and correcting underlying fungal or bacterial rot problems.
Snippet-ready answer: Bulb mites are tiny shiny white mites, usually Rhizoglyphus species, that feed in bulbs, corms, tubers, and roots. They often attack damaged or rotting tissue, causing poor rooting, weak growth, soft bulbs, reddish-brown scars, and decay. Control depends on clean bulbs, dry storage, sanitation, drainage, and removing badly infested material.
Bulb mites are small acarid mites that live in soil, potting mix, stored bulbs, and decaying organic matter. The species most often associated with ornamental bulbs and alliums belong to the genus Rhizoglyphus. They are widely reported from flower bulbs, greenhouse crops, onions, garlic, lilies, and other underground storage organs.
Unlike spider mites, bulb mites are not usually found webbing leaves in hot, dry weather. They prefer hidden, moist places: under loose bulb scales, inside cracks, around the basal plate, among roots, and within soft decaying tissue. This makes them easy to overlook until a plant fails to emerge or a stored bulb collapses.
Bulb mites are often part of a bigger problem. They may enter after a bulb has been bruised, cut, chilled improperly, overwatered, infected with fungus, or damaged by fungus gnat larvae or other pests. Once mites and rot organisms are both present, the bulb can deteriorate quickly.
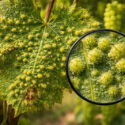
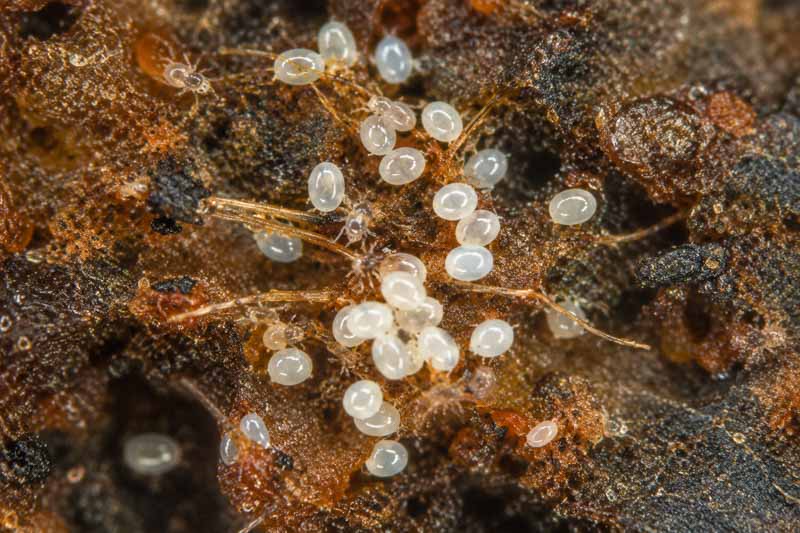
Adult bulb mites are tiny, shiny, creamy white to translucent, and oval-bodied. Mature mites are often about 0.5-1 mm long, large enough to see as moving specks but small enough that a hand lens is strongly recommended. Their legs are short and often reddish brown, making them look like tiny pearls with legs.
They are usually found in colonies. Because they move slowly and avoid light, they may look like eggs, grains of sand, or dust at first glance. If you expose a damaged bulb scale and watch closely, some of the white specks may begin to crawl away from the light.
Bulb mite eggs, immature stages, and adults may all be present together in damp, damaged tissue. Under favorable conditions, populations can build rapidly, especially in stored bulbs kept too warm or too moist.
Open a soft bulb and inspect the basal plate with a hand lens. Tiny shiny white oval mites with brownish legs, moving slowly in colonies under damaged scales, strongly suggest bulb mites.
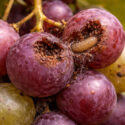
Bulb mite damage often begins below ground or in storage. Mites feed by scraping or piercing soft plant tissue, especially where a bulb has already been wounded or weakened. Their feeding creates more openings for fungi and bacteria, and those pathogens can turn the bulb soft, brown, and foul-smelling.
Infested bulbs may show reddish-brown discoloration on the fleshy scales, soft spots, basal plate injury, poor root development, or hollowed and decayed areas. If the growing point is damaged, the bulb may fail to sprout. If the bulb survives, the plant may emerge weakly with yellowing, stunted, or distorted leaves.
In lilies, bulb mites may also affect stem roots and underground stem tissue, causing dwarfed, distorted growth. In onions and garlic, bulb mites can reduce stands, stunt plants, injure the basal plate, and promote bulb rot in the field or storage. In stored flower bulbs, one infested or rotting bulb can become a source of mites for nearby healthy stock.
If stored bulbs become soft, sour-smelling, or reddish brown under the scales, do not simply plant them and hope. Open the bulb, check for mites, and discard badly damaged material before the infestation spreads.
Bulb mites and bulb rot often appear together, which can make diagnosis confusing. Fungal or bacterial rot may start first, weakening the bulb and attracting mites. In other cases, mite feeding opens the way for disease organisms. Either way, by the time the bulb is soft and decayed, both mites and pathogens may be involved.
A bulb with rot alone may be soft, discolored, moldy, or foul, but you may not see moving pests. A bulb with bulb mites usually has tiny shiny white mites clustered beneath damaged scales, around the basal plate, or in decaying tissue. A hand lens makes inspection much easier.
The management also overlaps. You must remove badly rotted bulbs, improve storage and drainage, reduce wounds, and avoid moving contaminated material. Trying to kill mites while leaving wet, infected, decaying bulb tissue in place is rarely successful.
Bulb mites develop through eggs, immature stages, and adults. They reproduce in protected, moist environments such as rotting bulbs, potting media, soil organic matter, and stored bulb lots. Development is faster in warm conditions and slower in cool storage.
When conditions are unfavorable, some acarid mites can produce resistant or dispersal stages that help them survive and move with soil, bulbs, containers, or other organisms. This is one reason bulb mites can persist in growing areas and reappear when susceptible bulbs are replanted.
In practical terms, bulb mites spread most easily through infested bulbs, contaminated soil or potting mix, old plant debris, reused crates or pots, and storage areas where rotting bulbs are left near clean ones.
Bulb mites have a wide host range, but they are especially important on plants with fleshy underground storage organs. Ornamental hosts include Narcissus, tulips, hyacinths, lilies, freesias, gladiolus, and irises.
Edible hosts include alliums, especially onions and garlic. Bulb mites may also be associated with other underground crops and decaying organic matter in soil.
The highest-risk plants are not always the healthiest ones. Bulb mites are especially likely to build up in bulbs that are wounded, diseased, stored too damp, planted in poorly drained soil, or surrounded by decomposing bulb waste.
Inspect bulbs before storage and again before planting. Removing one soft, mite-infested bulb early can protect an entire tray, crate, or container display.
There is no good reason to save a bulb that is soft, rotten, foul-smelling, and crawling with mites. Discard badly infested bulbs promptly. Do not compost them if the compost pile may later be used around susceptible bulbs or alliums.
For bulbs with minor surface damage, remove loose decayed scales, inspect carefully, and allow the bulb surface to dry before storage or planting. However, if the basal plate is damaged, roots are missing, or decay extends deep into the bulb, disposal is the safer choice.
Clean storage trays, pots, benches, and tools. Remove old bulb skins, rotted roots, spilled potting mix, and plant debris. If mites are present in a storage area, sanitation is as important as treating the bulbs themselves.
In commercial production, hot-water treatment, aerated steam, miticides, biological controls, and controlled storage may be used depending on crop and region, but heat treatments should be tested on small batches first because bulbs and cultivars vary in tolerance.
Bulb mites can affect potted bulbs, forced bulbs, amaryllis, lilies, and indoor bulb displays if the bulbs were purchased already infested or kept in wet, decaying conditions. Isolate suspicious containers immediately.
Remove the bulb from the pot and inspect the basal plate, roots, and scales with a hand lens. Discard bulbs that are soft, deeply rotted, foul-smelling, or heavily infested. Do not reuse contaminated potting mix. Wash the container thoroughly before reuse.
If a valuable bulb has only minor surface damage and the basal plate is firm, remove loose dead scales, let the bulb dry briefly in a well-ventilated place, and repot in fresh, free-draining mix. Reduce watering until healthy growth resumes. If rot continues, discard the bulb.
Outdoors, focus on drainage, sanitation, and rotation. Remove rotting bulbs, corms, tubers, and surrounding decayed debris. Avoid planting new bulbs into soil full of old bulb waste, diseased roots, or undecomposed organic matter.
Improve drainage before replanting. Raised beds, gritty soil amendments where appropriate, and careful watering can reduce the wet, oxygen-poor conditions that favor bulb rot. Handle bulbs gently at planting to avoid wounds.
Where bulb mites have repeatedly damaged alliums or ornamental bulbs, rotate to non-host plants for a season or longer. This is especially useful in vegetable beds where onions or garlic have suffered repeated basal plate injury and rot.
Where organic amendments or crop residues are used, allow them to break down fully before planting susceptible bulbs or alliums, since decaying organic matter can support mite populations.
For home gardeners, pesticides are rarely the first or best answer. Bulb mites hide inside damaged bulbs, under scales, and in rotting tissue, where sprays may not reach them. Also, if the underlying cause is rot, poor drainage, or contaminated storage, mite numbers can rebound.
Always follow local regulations and product labels. Do not use a pesticide unless it is labeled for mites, the crop or ornamental plant involved, and the specific site. For edible alliums such as onions and garlic, label restrictions are especially important.
A stronger strategy is integrated pest management: buy clean bulbs, reject damaged stock, store bulbs dry and cool, remove rotting bulbs quickly, clean containers and storage areas, improve drainage, and avoid planting susceptible bulbs into contaminated debris.
Bulb mites are often a symptom of a bigger bulb-health problem. If you do not fix wounds, wet storage, fungal rot, and decaying debris, mite control will not last.
Prevention is the heart of bulb mite management. Start with firm, clean bulbs, corms, and tubers. Reject anything soft, moldy, scarred, sour-smelling, or unusually light. Check the basal plate carefully before planting or storage.
A healthy bulb should feel firm, heavy, and clean. If it is soft, scarred, damp, and full of tiny moving white specks, do not plant it in hope. Remove the problem early, and you may save the rest of the planting.
Bulb mites are tiny but serious pests of bulbs, corms, tubers, onions, and garlic. They thrive in damaged, damp, and rotting tissue. The best control is clean stock, careful handling, dry storage, good drainage, sanitation, and removing infested bulbs before mites spread.
Bulb mites are tiny acarid mites, commonly Rhizoglyphus species, that feed on bulbs, corms, tubers, roots, and decaying underground plant tissue.
Bulb mites are shiny, creamy white to translucent, oval-bodied mites with short brownish legs. They move slowly and often occur in colonies under damaged bulb scales or near the basal plate.
Look for soft bulbs, reddish-brown scars, damaged basal plates, poor rooting, sour odor, decay, weak shoots, yellowing growth, and tiny moving white mites under damaged scales.
Bulb mites can attack narcissus, tulips, hyacinths, lilies, iris, freesia, gladiolus, onions, garlic, alliums, and other plants with bulbs, corms, tubers, or fleshy roots.
Bulb mites can feed in damaged tissue and help fungi and bacteria enter bulbs. Mites and pathogens together can make bulbs soft, brown, foul-smelling, and rotten.
Discard badly infested or rotting bulbs, remove decayed debris, clean pots and storage trays, improve drainage, use fresh potting mix, and plant only firm, clean bulbs.
Only slightly damaged bulbs with firm basal plates may be worth saving. Remove loose decayed scales, dry the bulb, and replant in fresh well-draining mix. Discard deeply rotted bulbs.
Avoid composting infested or rotting bulbs if the compost will be used around susceptible bulbs or alliums. Dispose of badly infested material securely.
Updated: June 2026 – Reviewed by Gardenia Editors
Create a membership account to save your garden designs and to view them on any device.
Becoming a contributing member of Gardenia is easy and can be done in just a few minutes. If you provide us with your name, email address and the payment of a modest $25 annual membership fee, you will become a full member, enabling you to design and save up to 25 of your garden design ideas.
Join now and start creating your dream garden!