Before you cut your crape myrtle back to bare stubs, step away from the saw. Most crape myrtles need far less pruning than gardeners think. Learn the best pruning time, which branches to remove, where to make each cut, and how to restore a tree damaged by crape murder.



Crape myrtles are admired for their graceful trunks, exfoliating bark, elegant branching, and spectacular summer flowers. Yet every winter, countless trees are cut back to rows of thick, blunt stubs in the mistaken belief that severe pruning is necessary.
It is not.
A properly selected and well-placed crape myrtle, botanically known as Lagerstroemia, often needs very little pruning. Healthy plants naturally produce new flowering shoots each spring. They do not need to be topped, pollarded, or reduced to bare trunks to bloom.
The purpose of pruning is to solve a specific problem. You may need to remove dead wood, correct crossing branches, improve clearance, eliminate unwanted suckers, or rebuild a tree damaged by past topping. The objective is not to force every branch to the same height or create a perfectly symmetrical canopy.
This guide explains when to prune a crape myrtle, which branches to remove, where to make each cut, how much growth can safely be removed, how to avoid “crape murder,” and how to restore a badly topped tree over time.
The golden rule: Never remove a branch unless you can explain why it needs to go. If the tree is healthy, well structured, and not obstructing anything, leaving it alone may be the best choice.
“Crape murder” is the severe topping of a crape myrtle, usually during winter. The upper trunks and major limbs are cut back to thick, matching stubs, often at approximately the same height.
When growth resumes, dense clusters of shoots erupt just below the cuts. These shoots may grow quickly and eventually produce flowers, but they are not evidence that topping benefited the plant. They are a vigorous response to the sudden loss of the canopy.
The new stems are often weakly attached around large wounds. As they lengthen, their heavy foliage and flower panicles may cause them to bend or break during wind and rain. Repeated topping also creates swollen knobs, ruins the natural branch taper, and conceals the attractive trunks and bark that make crape myrtles valuable throughout the year.
Myth: Crape myrtles must be cut back hard every winter to bloom.
Reality: Crape myrtles flower on current-season growth, but that growth develops naturally each spring. Pruning is not required to create flowering wood.
The best time for most structural pruning is late winter or early spring, while the plant is dormant and before vigorous new growth begins. Without leaves, the framework is easier to inspect, and you can clearly see rubbing limbs, crowded growth, weak attachments, old topping wounds, and branches that interfere with buildings or pathways.
Timing varies with climate. In colder regions, wait until the coldest part of winter has passed so winter-damaged branches are easier to identify. Complete the work before the canopy begins active spring growth.
Because flowers develop at the tips of current-season shoots, pruning after vigorous spring growth begins can remove potential flowering stems and delay the summer display.
Timing shortcut: Prune after the coldest winter weather but before strong spring growth. Bare branches make the structure easier to evaluate, and the tree can direct new growth into the framework you retain.
Summer is not the ideal time for major restructuring. Removing a large amount of active foliage reduces the tree’s ability to produce energy and may stimulate tender replacement shoots. Cutting branch tips can also remove developing flowers.
Small corrections are acceptable. Remove broken branches, unwanted basal suckers, and low shoots that create an immediate clearance problem. On small or dwarf crape myrtles, faded flower panicles may be clipped promptly to improve appearance and sometimes encourage a lighter second flush of bloom.
Deadheading is optional. Do not climb ladders or cut back major branches merely to remove seed capsules from a large tree.
No. A mature crape myrtle with an attractive structure, adequate clearance, and no damaged branches may need nothing more than occasional removal of dead wood or unwanted suckers.
Pruning is most useful while the plant is young. Early structural training can establish a few well-spaced trunks, remove rubbing branches, and create necessary clearance before the limbs become large. Several small, well-placed cuts are far better than a major correction years later.
Point to the branch you plan to remove and finish this sentence: “This branch needs to go because…”
If you cannot name a structural, health, clearance, or safety reason, put down the pruning saw.
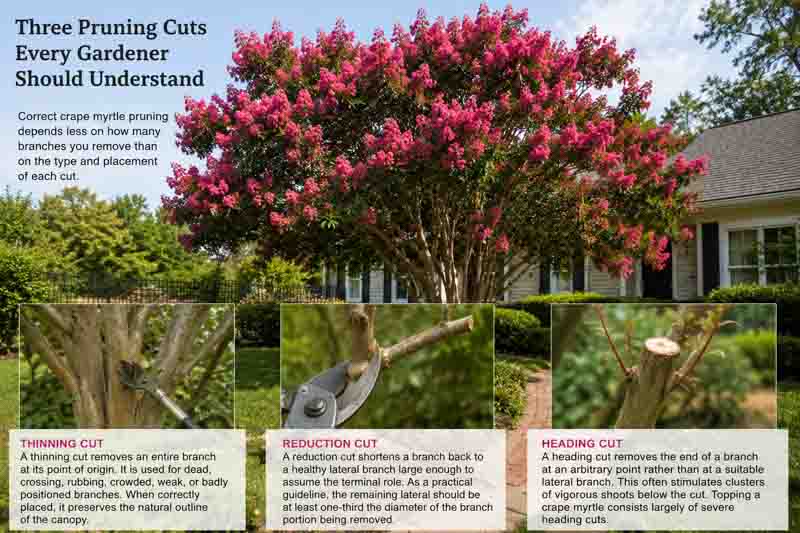
Correct crape myrtle pruning depends less on how many branches you remove than on the type and placement of each cut.
A thinning cut removes an entire branch at its point of origin. It is used for dead, crossing, rubbing, crowded, weak, or badly positioned branches. When correctly placed, it preserves the natural outline of the canopy.
A reduction cut shortens a branch back to a healthy lateral branch large enough to assume the terminal role. As a practical guideline, the remaining lateral should be at least one-third the diameter of the branch portion being removed. A smaller lateral may not be able to assume dominance and can leave the cut functioning more like a heading cut.
Reduction cuts are useful when a limb must be shortened for clearance without leaving a stub or cutting the entire canopy to one height.
A heading cut removes the end of a branch at an arbitrary point rather than at a suitable lateral branch. This often stimulates clusters of vigorous shoots below the cut. Topping a crape myrtle consists largely of severe heading cuts.
Thinning cuts remove entire unwanted branches. Reduction cuts shorten branches to a substantial lateral. Heading cuts leave abrupt ends and often trigger crowded regrowth.
Use clean, sharp tools matched to the size of the branch. Bypass hand pruners are suitable for thin shoots and suckers. Long-handled loppers provide leverage for somewhat larger branches, while a curved pruning saw is more effective for substantial limbs.
Do not force hand pruners through wood that is too large for them. Crushing or twisting creates ragged wounds and may damage the tool.
Never prune branches near electrical lines. Do not operate a chainsaw from a ladder, and do not stand beneath a heavy limb that cannot be lowered in a controlled manner.
Hire a qualified arborist for large, high, decayed, storm-damaged, or dangerously positioned branches.
Begin several feet away. Look at the trunk arrangement, canopy balance, branch spacing, and nearby structures. Identify the specific problems you need to solve before making the first cut.
Do not try to create perfect symmetry. Natural variation gives crape myrtles their character. The goal is a stable, attractive framework, not a geometric sculpture.
Start with branches that are clearly dead, split, broken, or diseased. Trace each one back to healthy wood or to its point of origin.
Dead branches may be removed whenever they are safely identified. If winter damage is uncertain, wait until spring growth reveals which sections are alive. Living stems will begin to leaf out, while dead sections remain bare and brittle.
Branches that rub against one another damage their bark and create wounds. When two branches cross, keep the stronger and better positioned one. Remove the branch that grows inward, is damaged, has the weaker attachment, or interferes with the natural framework.
Do not strip out every interior twig. Excessive thinning can produce vigorous replacement shoots and leave the canopy unnaturally sparse.
Thin dense clusters selectively, particularly those arising from old topping cuts. Favor outward-growing stems with strong attachment angles. Remove shoots that grow directly inward, downward, or through the center of the canopy.
When several large trunks originate close together, inspect them carefully for rubbing, cracks, or included bark. Major trunk corrections are best made while the plant is young. Removing a mature trunk creates a large wound and may require professional evaluation.
Lower branches may be removed to clear walkways, driveways, windows, or mowing areas and to reveal the attractive trunks. This is known as crown raising.
Work gradually. Removing too many lower branches at once can create an unnaturally bare trunk and a top-heavy canopy. Preserve enough foliage to maintain balance and healthy growth.
Crape myrtles often produce shoots from the base or lower trunks. Remove unwanted suckers close to their point of origin while they are young. Leaving several inches of stem creates conspicuous stubs and encourages repeated regrowth.
On shrub-form or naturally multi-stem specimens, some basal growth may contribute to the desired habit. Remove only the shoots that conflict with the structure you want.
When removing an entire branch, cut just outside the branch collar – the slightly swollen area where the branch joins the trunk or a larger limb. Do not cut flush against the trunk, and do not leave a long stub.
When shortening a branch, make a reduction cut back to a healthy lateral branch that is at least one-third the diameter of the removed portion and large enough to continue the branch line. Do not cut major limbs at arbitrary points simply because you want the tree to be shorter.
Too close: A flush cut damages trunk tissue and enlarges the wound.
Too far: A long stub dies back and closes poorly.
Just right: Cut immediately outside the branch collar without injuring it.
A heavy branch can tear bark down the trunk if it falls before the cut is complete. Use the three-cut method:
If the branch is too heavy to control safely from the ground, do not attempt the cut yourself.
Less is usually better. As a general ceiling, avoid removing more than about 25% of the live canopy in one pruning session. Mature, weak, recently transplanted, drought-stressed, or otherwise declining trees should lose substantially less.
The 25% figure is not a target. It is an upper limit for healthy trees, and most routine crape myrtle pruning should remove far less. Taking away too much foliage forces the tree to replace lost leaf area, often with vigorous water sprouts and basal suckers.
When renovating a neglected or badly structured tree, spread corrective pruning over several seasons. Remove hazardous, dead, damaged, and severely rubbing branches first. Allow the tree to respond before making additional major changes.
Stop before the tree looks “finished”: A correctly pruned crape myrtle should still look like a natural tree, with a leafy canopy supported by gradually tapering branches.
Removing seed capsules is optional. Leaving them in place does not prevent the plant from flowering the following year.
On a small shrub, clipping faded flower clusters promptly may improve appearance and sometimes encourage a lighter second flush of bloom. On a large tree, removing every capsule is unnecessary, time-consuming, and potentially unsafe.
Never top branches simply to eliminate old seed heads.
Dwarf and compact crape myrtles can be maintained as low mounds, rounded shrubs, or small multi-stem accents. Remove dead or damaged growth and thin a few crowded stems when necessary. Light selective shaping is preferable to repeated shearing.
Some compact selections can tolerate more renewal pruning than large tree-form cultivars, especially where winter cold kills the top growth. However, routine cutting to the ground should not be applied automatically to every dwarf plant.
Browse crape myrtle varieties to compare mature heights and growth habits. Choosing a naturally compact selection is far easier than repeatedly forcing a large cultivar into a small space.
A topped crape myrtle can often be improved, but restoration takes several growing seasons. Do not cut every new shoot back to the same swollen knobs each winter. That simply repeats the damage.
In late winter or early spring, examine the shoots growing below each old topping cut. Retain the strongest outward-growing shoot. In some locations, you may retain two well-spaced shoots if the tree’s framework requires them. Remove weaker and crowded competitors at their origins.
Allow the selected shoots to lengthen and branch naturally. During later pruning sessions, remove additional poorly positioned growth and continue developing a permanent framework.
Large knobs, extensive decay, cracks, or severe structural weakness may make restoration difficult. A qualified arborist can determine whether gradual renovation or replacement is the safer option.
Do not expect a topped crape myrtle to regain an elegant canopy after one pruning session. Select the best replacement shoots, remove competitors gradually, and rebuild the structure over several seasons.
A crape myrtle that repeatedly outgrows its site is usually the wrong cultivar for the location. Topping may temporarily reduce its height, but it creates rapid regrowth and an endless cycle of damaging annual cuts.
If an individual branch reaches a roof, window, or pathway, trace it back to a suitable lateral branch and make a reduction cut. The retained lateral should be substantial enough – ideally at least one-third the diameter of the removed portion – to continue the branch line without triggering excessive regrowth.
When the entire plant is fundamentally too large, replacement with a more compact cultivar may be the most practical long-term solution. Gardenia’s crape myrtle growing guides can help you compare growth habits, mature sizes, and care requirements.
| Mistake | Why It Causes Problems | Better Approach |
|---|---|---|
| Cutting all trunks to one height | Creates large wounds and clusters of weak shoots | Preserve the permanent framework |
| Pruning simply because it is winter | Removes healthy branches without solving a problem | Prune only for structure, health, safety, or clearance |
| Removing every interior twig | Overthins the canopy and stimulates regrowth | Thin selectively |
| Leaving long stubs | Stubs die back and close poorly | Cut just outside the branch collar |
| Making flush cuts | Damages the branch collar and trunk tissue | Preserve the swollen collar at the branch base |
| Removing too much canopy at once | Triggers stress, water sprouts, and excessive regrowth | Stay well below the 25% ceiling whenever possible |
| Trying to keep a large cultivar permanently small | Creates repeated regrowth and annual damage | Use reduction cuts or replace it with a compact cultivar |
Routine pruning cuts generally do not need wound paint or pruning sealer. A correctly placed cut allows the tree to form protective tissue around the wound naturally.
Sealants do not correct a poor cut and may trap moisture. The most important practices are using sharp tools, preserving the branch collar, avoiding unnecessary large wounds, and making each cut cleanly.
The best-pruned crape myrtle often looks as though very little has been done. Its trunks remain graceful, its branches taper naturally, and its canopy retains enough foliage to look like a healthy tree rather than an umbrella of weak shoots.
Prune in late winter or early spring only when there is a clear purpose. Remove dead or damaged wood, correct rubbing and poorly positioned branches, provide necessary clearance, and eliminate unwanted suckers. Use thinning and reduction cuts rather than indiscriminate heading cuts.
Most importantly, never top a crape myrtle to make it flower or to force a large cultivar permanently into a small space. Preserve its natural framework, remove less rather than more, make every cut count, and allow its bark, branching, and summer flowers to provide the beauty.
Prune a crape myrtle in late winter or early spring, after the coldest winter weather but before vigorous new growth begins. Dead, broken, or hazardous branches may be removed whenever they are safely identified.
No. Many established crape myrtles need little or no annual pruning. Prune only to remove dead or damaged wood, correct structural problems, provide necessary clearance, or maintain a deliberate form.
Crape murder is the severe topping of a crape myrtle by cutting the main trunks and branches back to large, matching stubs. It destroys the natural framework and produces clusters of weakly attached replacement shoots.
Yes. Healthy crape myrtles naturally produce new flowering shoots each spring and can bloom abundantly without annual pruning. Severe pruning is not required to create flowering wood.
Limit summer pruning to broken branches, unwanted suckers, immediate clearance problems, and optional deadheading on small plants. Major summer pruning removes active foliage and may remove developing flowers.
Removing crape myrtle seed pods is optional. Leaving them does not prevent flowering the following year. Deadheading may encourage a lighter second bloom on small plants, but removing every pod from a large tree is unnecessary.
At each old topping point, retain the strongest outward-growing shoot, or occasionally two well-spaced shoots where the framework requires them. Remove weaker competitors and rebuild the canopy gradually over several growing seasons.
Use selective reduction cuts to shorten individual branches back to suitable lateral branches at least one-third the diameter of the removed portion. If the tree repeatedly outgrows its location, replace it with a compact cultivar.
Avoid removing more than about 25% of the live canopy in one session, and remove substantially less from mature, weak, recently transplanted, or stressed trees. Most routine pruning should remove far less than this limit.
Updated: July 2026 • Reviewed by Gardenia Editors
| Hardiness |
6 - 10 |
|---|---|
| Plant Type | Shrubs, Trees |
| Plant Family | Lythraceae |
| Genus | Lagerstroemia |
| Exposure | Full Sun |
| Season of Interest | Spring (Late), Summer (Early, Mid, Late), Fall |
| Height | 2' - 30' (60cm - 9.1m) |
| Spread | 2' - 30' (60cm - 9.1m) |
| Maintenance | Low |
| Water Needs | Average |
| Soil Type | Chalk, Loam, Sand |
| Soil pH | Acid, Neutral |
| Soil Drainage | Well-Drained |
| Characteristics | Showy |
| Tolerances | Deer, Drought, Clay Soil |
| Landscaping Ideas | Beds And Borders, Patio And Containers, Wall-Side Borders |
| Garden Styles | City and Courtyard, Informal and Cottage, Mediterranean Garden |
| Hardiness |
6 - 10 |
|---|---|
| Plant Type | Shrubs, Trees |
| Plant Family | Lythraceae |
| Genus | Lagerstroemia |
| Exposure | Full Sun |
| Season of Interest | Spring (Late), Summer (Early, Mid, Late), Fall |
| Height | 2' - 30' (60cm - 9.1m) |
| Spread | 2' - 30' (60cm - 9.1m) |
| Maintenance | Low |
| Water Needs | Average |
| Soil Type | Chalk, Loam, Sand |
| Soil pH | Acid, Neutral |
| Soil Drainage | Well-Drained |
| Characteristics | Showy |
| Tolerances | Deer, Drought, Clay Soil |
| Landscaping Ideas | Beds And Borders, Patio And Containers, Wall-Side Borders |
| Garden Styles | City and Courtyard, Informal and Cottage, Mediterranean Garden |
Create a membership account to save your garden designs and to view them on any device.
Becoming a contributing member of Gardenia is easy and can be done in just a few minutes. If you provide us with your name, email address and the payment of a modest $25 annual membership fee, you will become a full member, enabling you to design and save up to 25 of your garden design ideas.
Join now and start creating your dream garden!
Create a membership account to save your garden designs and to view them on any device.
Becoming a contributing member of Gardenia is easy and can be done in just a few minutes. If you provide us with your name, email address and the payment of a modest $25 annual membership fee, you will become a full member, enabling you to design and save up to 25 of your garden design ideas.
Join now and start creating your dream garden!