Are your camellia leaves yellow, mottled, spotted, stippled, or wilting? Use the foliage pattern to distinguish iron chlorosis, nutrient deficiency, natural aging, root rot, disease, virus, spider mites, tea scale, and transplant stress. This visual diagnostic guide explains what each symptom means and the most effective fix.
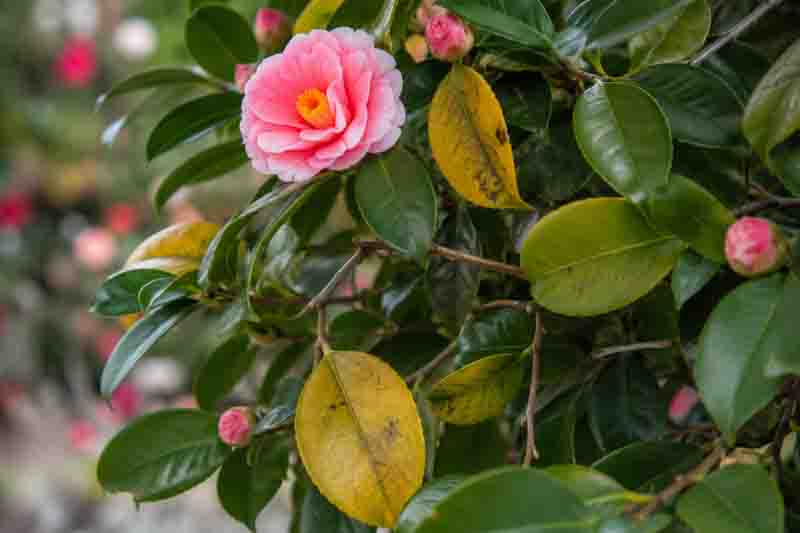


Yellow leaves on a camellia can mean anything from harmless seasonal aging to unsuitable soil pH, damaged roots, disease, or a pest infestation. The pattern matters. A leaf that turns yellow between green veins is telling a different story from one covered in tiny pale specks, irregular mottling, or spreading brown spots.
Before reaching for fertilizer or pesticide, look closely at where the yellowing begins, which leaves are affected, and whether the plant is also wilting, dropping leaves, growing poorly, or developing spots. Those clues can quickly narrow the diagnosis.
Camellias are acid-loving evergreen shrubs with shallow, moisture-sensitive roots. They grow best in acidic, organically rich, moisture-retentive but well-drained soil. When soil chemistry, drainage, watering, or root health is unsuitable, the foliage often shows the first warning signs.
Use this visual guide to identify why your camellia leaves are turning yellow and what to do next.
Do not fertilize automatically: Yellow leaves can result from damaged or waterlogged roots that cannot absorb nutrients. Adding fertilizer will not repair unhealthy roots and may increase stress.
| What You See | Most Likely Explanation | Check Next |
|---|---|---|
| Yellow tissue between green veins | Iron or manganese chlorosis on young leaves; possible magnesium deficiency on older leaves | Leaf age, soil pH, drainage, and root health |
| Leaves uniformly pale green or yellow | Nutrient shortage or poor nutrient uptake | New growth, fertilizer history, roots, and soil test |
| Older inner or lower leaves yellow and fall | Natural aging or mild root and moisture stress | Whether young foliage remains healthy |
| Yellow leaves with brown spots or blotches | Leaf disease or environmental injury | Spot shape, spread, weather, and affected branches |
| Irregular yellow mottling, rings, or patches | Possible viral infection | Whether symptoms are limited to certain branches |
| Yellow leaves accompanied by wilting | Root rot, waterlogging, drought, or severe root stress | Soil moisture, drainage, planting depth, and roots |
| Fine stippling or larger yellow splotches | Fine stippling suggests spider mites; larger splotches may indicate tea scale | Inspect leaf undersides for mites, webbing, scales, or cottony masses |
| Yellowing begins soon after planting | Transplant shock or watering problem | Root-ball moisture, planting depth, and drainage |
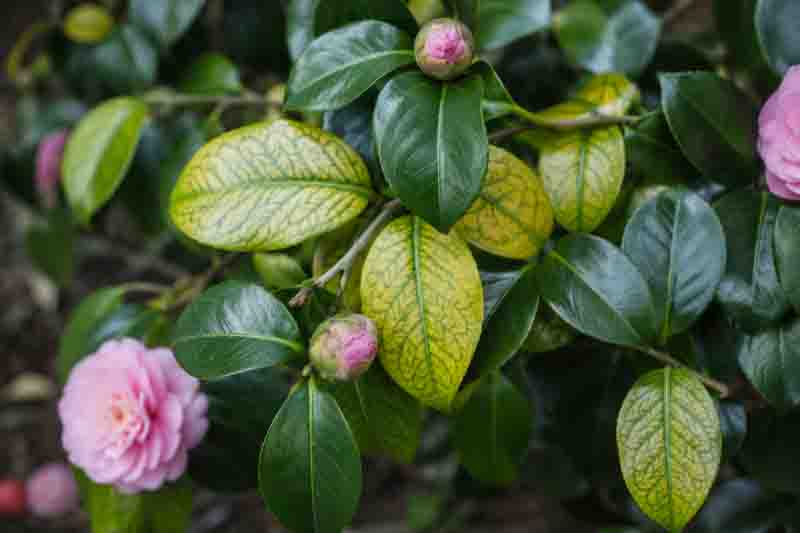
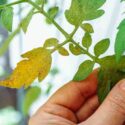
Yellow tissue between veins that remain green is called interveinal chlorosis. On camellias, this frequently develops when the soil or potting mix is too alkaline. Iron and manganese may be present in the soil but become chemically unavailable to the roots as pH rises.
Iron chlorosis normally appears first on young leaves near the shoot tips. The newest foliage may become pale yellow or nearly cream while the veins remain distinctly green. Manganese deficiency can look similar. Magnesium deficiency more often begins on older foliage, so the age and location of the affected leaves provide useful clues.
Camellias generally perform best in acidic soil with a pH of approximately 5.5-6.5. Irrigation with hard, alkaline water can gradually raise the pH of container compost, even when the plant was originally potted in an ericaceous mix.
Test the soil or potting mix before applying supplements. If the pH is too high, correct the underlying conditions rather than repeatedly feeding the symptoms. Container-grown camellias may need fresh ericaceous potting mix and, where practical, rainwater instead of highly alkaline tap water.
A chelated iron product formulated for acid-loving plants can temporarily improve confirmed iron chlorosis. Follow the label carefully, because more iron will not correct yellowing caused by root rot, drought, or another nutrient deficiency.
Important distinction: Chlorosis often reflects nutrient unavailability, not an absolute absence of iron in the soil. Correcting pH and root conditions is more effective than repeatedly adding fertilizer.
When entire leaves become uniformly pale green or yellow rather than yellowing between the veins, the camellia may have a broader nutrient problem. Nitrogen deficiency can produce generally pale foliage and weak growth, while depleted potting mix can leave container plants undernourished.
Root health must still be considered. Waterlogged, compacted, drought-damaged, or diseased roots cannot absorb nutrients efficiently. A plant may therefore look deficient even when the soil contains adequate fertility.
Compare the newest and oldest growth. Nutrient deficiencies differ in where symptoms first appear, while severe root dysfunction often causes more generalized yellowing, reduced growth, leaf loss, or wilting.
Inspect drainage, watering, and root health before feeding. If the plant is growing actively and the roots appear healthy, apply a fertilizer formulated for camellias, azaleas, or other acid-loving plants at the label rate.
For persistent yellowing in garden soil, obtain a soil test. Avoid guessing with repeated applications of nitrogen, iron, magnesium, or Epsom salts.
Camellias are evergreen, but evergreen does not mean that every leaf remains attached forever. Older leaves within the shrub or near the lower parts of branches periodically turn yellow and fall as they are replaced by new foliage.
Natural aging is most likely when yellowing is limited to a relatively small number of old leaves and the plant otherwise has healthy new growth, normal vigor, and firm green foliage. Seasonal shedding may be especially noticeable in spring or early summer.
Widespread lower-leaf yellowing can also indicate root stress, drought, compacted soil, or excessive moisture. The difference is usually visible in the rest of the plant: natural shedding leaves the canopy healthy, while root problems are accompanied by weak growth, wilting, branch decline, or continuing leaf loss.
No treatment is needed when only older inner or lower leaves yellow and the new growth remains healthy. If yellowing spreads rapidly or affects multiple age groups, check soil moisture, drainage, planting depth, and root condition.
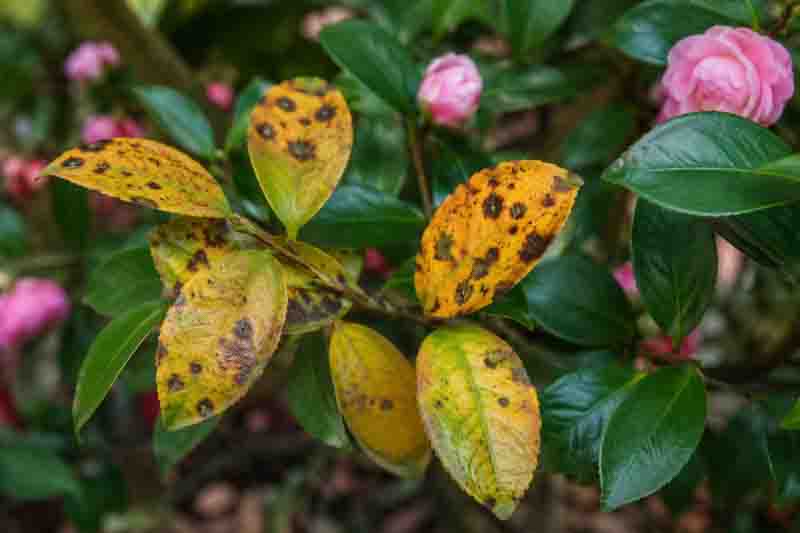
Yellowing accompanied by brown, tan, gray, or black spots suggests damaged leaf tissue rather than a simple nutritional problem. Fungal leaf spots, algal leaf spot, cold injury, sun scorch, drought, and chemical damage can all produce discolored patches.
Disease spots often enlarge or increase in number during favorable weather. Some develop darker margins, concentric patterns, fruiting structures, or yellow halos. Algal leaf spot may produce raised, velvety spots that become gray-green, reddish, or brown.
Environmental damage tends to correspond with a specific event or exposure. Frost injury may affect outer leaves after a cold night, while sun scorch is more likely on exposed foliage receiving intense heat and light. Spray injury may develop shortly after a pesticide, fertilizer, or herbicide application.
Remove heavily affected leaves and collect fallen foliage from beneath the shrub. Water at soil level rather than repeatedly wetting the foliage. Improve airflow with selective pruning after flowering, but do not strip the plant or expose it suddenly to intense sun.
Because spots can have several causes, identify the disease before applying a fungicide. A local extension office or plant clinic can help when spots continue spreading or are accompanied by branch dieback.
Remember that camellia petal blight affects the flowers, not the leaves. Brown leaf spots should not automatically be diagnosed as flower blight.
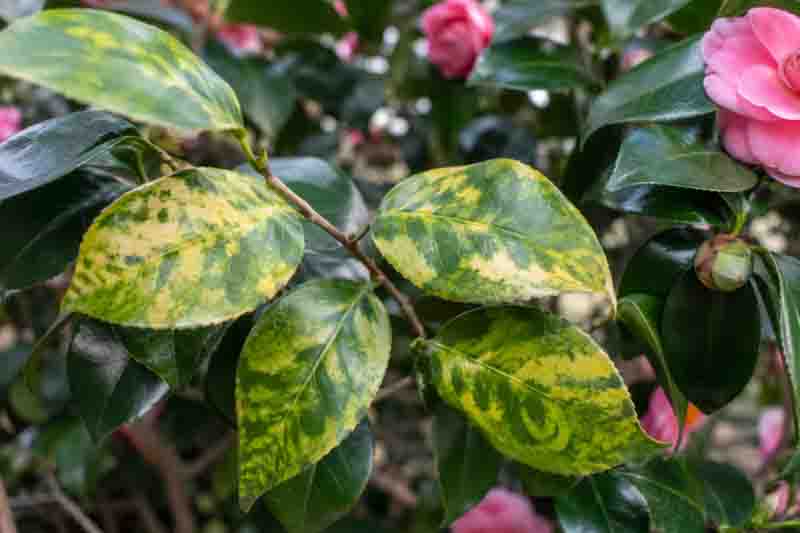
Irregular yellow, cream, or pale-green blotches may indicate viral infection, particularly when the pattern appears on only some branches. Viral symptoms can include mottling, rings, mosaic patterns, yellow patches, distorted young leaves, or variegation in both foliage and flowers.
Virus-associated patterns are usually less orderly than nutrient chlorosis. Instead of following the veins consistently, the discoloration may form random patches, rings, streaks, or uneven mosaics. An affected camellia may nevertheless continue to grow and flower for years.
Camellia viruses are commonly spread through infected propagation material, including grafts, buds, and cuttings. Some variegated camellias were historically propagated specifically because their viral color patterns were considered ornamental.
There is no spray or fertilizer that cures a virus-infected camellia. Do not propagate the plant through cuttings, budding, or grafting, and purchase replacement plants from reputable sources.
Affected branches may be removed when the discoloration is objectionable, but pruning should not be expected to eliminate the infection. A vigorous plant with limited ornamental symptoms may continue growing and flowering satisfactorily.
Do not diagnose by color alone: Nutrient deficiencies, herbicide injury, mites, and genetic variegation can resemble viral mottling. Laboratory testing is required for definitive virus identification.
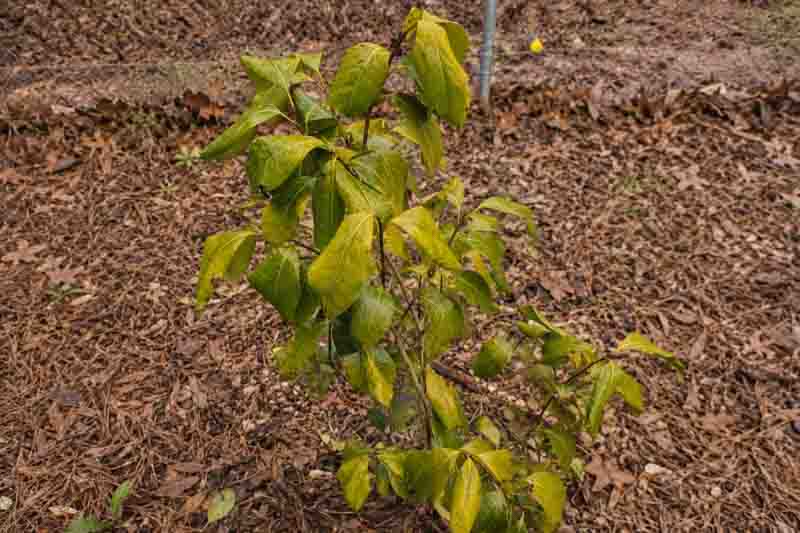
Yellow foliage combined with wilting, poor growth, or branch decline is a serious warning sign. The roots may be unable to supply water because the soil is saturated, the plant is severely dry, or root tissue has begun to decay.
Camellias require moisture but are highly vulnerable to poorly drained conditions. Waterlogged soil displaces oxygen from the root zone and favors destructive root diseases, including Phytophthora root rot. Affected plants may develop uniformly yellow foliage, wilt despite wet soil, lose feeder roots, and decline gradually or rapidly.
Severe drought can create deceptively similar symptoms. Before watering, feel the soil several inches below the surface. Do not assume that every wilted camellia needs more water.
If the soil is dry, water slowly and deeply, then maintain even moisture. If the soil remains wet long after rain, stop unnecessary irrigation and correct the drainage problem.
Examine accessible roots where decline is severe. Healthy feeder roots are generally firm and pale inside; rotted roots become brown, soft, or reduced. Advanced root rot is difficult to reverse, so accurate diagnosis and drainage correction are essential.
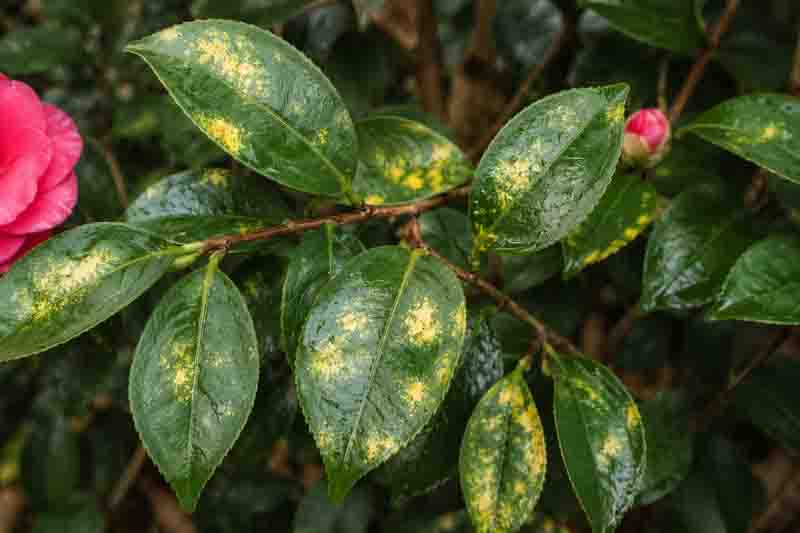
Fine yellow dots, pale stippling, bronzing, or irregular yellow splotches often point toward sap-feeding pests. On camellias, two important possibilities are spider mites and tea scale.
Spider mites remove the contents of individual leaf cells, producing numerous tiny pale dots. As infestations increase, leaves may become yellow, bronzed, or brown and fall prematurely. Fine webbing, eggs, cast skins, or tiny moving mites may be visible beneath the leaves with a hand lens.
Spider mites often become more damaging during hot, dry, dusty weather and on drought-stressed plants.
Tea scale is one of the most important camellia pests. Infested leaves develop yellow splotches or patches on their upper surfaces. On the underside, look for small elongated scales, white male coverings, dark female coverings, or a dense cottony-looking accumulation during heavy infestations.
Severe tea-scale infestations can cause extensive yellowing, premature leaf drop, reduced flowering, twig dieback, and long-term weakening.
Inspect the undersides of several leaves before treating. For suspected mites, tap foliage over white paper and look for tiny moving specks. For scale, look for fixed coverings attached to the leaf tissue.
Remove heavily infested foliage where practical and preserve beneficial predators. Horticultural oils or insecticidal soaps may help with certain infestations when applied correctly, but timing and coverage are critical. Follow the label and avoid treating open flowers or heat-stressed plants. See Gardenia’s guide to scale insects for additional identification and management guidance.
Sudden yellowing after planting usually reflects transplant stress rather than an immediate nutrient deficiency. The original root ball may have dried out, remained saturated, or been planted too deeply. Roots circling within a container may also struggle to expand into the surrounding soil.
A common watering mistake is moistening the surrounding garden soil while the original potting mix remains dry. The reverse can also occur: dense garden soil may trap water around a more porous root ball, leaving roots waterlogged.
Planting depth is especially important. Camellias have shallow roots and should not be buried below their original soil level. Soil or mulch piled against the trunk reduces oxygen around the upper roots and can encourage decline.
Check the moisture inside the original root ball as well as the surrounding soil. Water deeply when needed, but do not irrigate on a fixed schedule when the root zone remains wet.
The top of the root ball should sit at or slightly above the surrounding soil level. Pull mulch away from the trunk, avoid fertilizer while the plant is stressed, and allow time for new roots to establish.
For complete planting and establishment guidance, see How to Plant, Care for, and Grow Camellias.
Diagnose the yellowing pattern before applying fertilizer, pesticide, or fungicide. Green veins, uniform pallor, brown spots, mottling, wilting, and stippling point toward different causes and require different responses.
When yellow leaves are accompanied by wilting or rapid decline, inspect soil moisture and root health first. A root problem can imitate nutrient deficiency while preventing the plant from using any fertilizer you add.
If your camellia leaves are turning yellow, begin with the visible pattern. Green veins suggest chlorosis and unsuitable pH. Uniformly pale foliage may indicate inadequate nutrition or poor nutrient uptake. A few yellow older leaves may be normal, while extensive yellowing with wilting points toward a root or drainage problem.
Brown spots, irregular mottling, and fine stippling require closer inspection for disease, virus, spider mites, or tea scale. Sudden yellowing after planting usually calls for a review of planting depth, root-ball moisture, and drainage rather than an immediate dose of fertilizer.
Once the correct cause is identified, most cultural problems can be improved by restoring acidic soil conditions, steady moisture, healthy drainage, and proper root care. The leaves already damaged may not turn green again, but healthy new growth is the clearest sign that the solution is working.
Yellow tissue between green veins is interveinal chlorosis. On camellias, it is commonly associated with iron or manganese becoming unavailable because the soil or potting mix is too alkaline. Test the pH and inspect root health before treating.
Yes. Camellias periodically shed older leaves even though they are evergreen. Limited yellowing of older inner or lower leaves is usually normal when the plant has healthy new growth and shows no wilting or dieback.
Yellowing with wilting can result from waterlogged soil, Phytophthora root rot, severe drought, or damaged roots. Check moisture several inches below the surface and inspect drainage before adding water or fertilizer.
Yellow spots or splotches may be caused by tea scale, while fine pale stippling may indicate spider mites. Inspect the undersides of affected leaves for scale coverings, cottony material, tiny moving mites, cast skins, or webbing.
Yes. Camellias are acid-loving plants. In alkaline soil, iron and manganese may become unavailable to the roots, causing yellow tissue between green veins, especially on younger leaves.
Not until you identify the cause. Yellow leaves may result from alkaline soil, root rot, overwatering, drought, natural aging, pests, or disease. Fertilizer will not correct damaged roots or poor drainage and may worsen stress.
Possible virus symptoms include irregular yellow mottling, rings, mosaics, blotches, or distorted leaves, sometimes limited to particular branches. Nutrient disorders and other injuries can look similar, so laboratory testing is required for definitive confirmation.
A newly planted camellia may yellow because of transplant shock, a dry or saturated root ball, poor drainage, deep planting, or damaged roots. Check moisture inside the original root ball and make sure its top is at or slightly above soil level.
Updated: July 2026 • Reviewed by Gardenia Editors
| Hardiness |
6 - 9 |
|---|---|
| Heat Zones |
7 - 8 |
| Climate Zones | 4, 5, 6, 7, 8, 9, 12, 14, 15, 16, 17, 18, 19, 20, 21, 22, 23, 24 |
| Plant Type | Shrubs |
| Plant Family | Theaceae |
| Genus | Camellia |
| Exposure | Full Sun, Partial Sun, Shade |
| Season of Interest | Spring (Early, Mid), Fall, Winter |
| Maintenance | Low |
| Water Needs | Average |
| Soil Type | Clay, Loam, Sand |
| Soil pH | Acid, Neutral |
| Soil Drainage | Moist but Well-Drained, Well-Drained |
| Characteristics | Cut Flowers, Fragrant, Plant of Merit, Showy |
| Landscaping Ideas | Beds And Borders, Hedges And Screens, Patio And Containers, Wall-Side Borders |
| Garden Styles | City and Courtyard, Informal and Cottage, Japanese Garden, Traditional Garden |
| Hardiness |
6 - 9 |
|---|---|
| Heat Zones |
7 - 8 |
| Climate Zones | 4, 5, 6, 7, 8, 9, 12, 14, 15, 16, 17, 18, 19, 20, 21, 22, 23, 24 |
| Plant Type | Shrubs |
| Plant Family | Theaceae |
| Genus | Camellia |
| Exposure | Full Sun, Partial Sun, Shade |
| Season of Interest | Spring (Early, Mid), Fall, Winter |
| Maintenance | Low |
| Water Needs | Average |
| Soil Type | Clay, Loam, Sand |
| Soil pH | Acid, Neutral |
| Soil Drainage | Moist but Well-Drained, Well-Drained |
| Characteristics | Cut Flowers, Fragrant, Plant of Merit, Showy |
| Landscaping Ideas | Beds And Borders, Hedges And Screens, Patio And Containers, Wall-Side Borders |
| Garden Styles | City and Courtyard, Informal and Cottage, Japanese Garden, Traditional Garden |
Create a membership account to save your garden designs and to view them on any device.
Becoming a contributing member of Gardenia is easy and can be done in just a few minutes. If you provide us with your name, email address and the payment of a modest $25 annual membership fee, you will become a full member, enabling you to design and save up to 25 of your garden design ideas.
Join now and start creating your dream garden!
Create a membership account to save your garden designs and to view them on any device.
Becoming a contributing member of Gardenia is easy and can be done in just a few minutes. If you provide us with your name, email address and the payment of a modest $25 annual membership fee, you will become a full member, enabling you to design and save up to 25 of your garden design ideas.
Join now and start creating your dream garden!